Homemade Pumpkin Puree
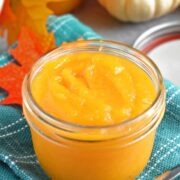
Homemade Pumpkin Puree: simple and easy way to make applesauce-consistency fresh pumpkin puree to store in refrigerator or freeze for up to a year. Pumpkin puree can be used in many different desserts and meals and the taste is always delightful!

This post may contain affiliate links. Read my disclosure policy.
Homemade Pumpkin Puree Recipe:
Making homemade pumpkin puree is extremely easy! The texture is applesauce-consistency and the color of puree is very light and bright orange. While most people like to use the baking method, my family had always used the stovetop method to can in glass jars. These keep for up to a year in the refrigerator without going bad. For other storage option, we freeze it for up to 1 year.
We boil the puree twice to remove all the bacteria from the puree and puree stays fresh in sterilized glass jars for up to a year in refrigerator. Just the perfect amount to enjoy pumpkin bread through the year until next time you make the puree.
I also think that with boiling method, the puree turns out very soft, like a very thin applesauce and you don’t get that with the baking method. It’s very easy to put the pumpkin puree into jars as the texture is not as thick as store-bought and it covers every bit of space in the jar.
We don’t celebrate Halloween, but I love fall and it’s my favorite season of the year because of its colorful beauty outside of my window and the crisp air. I also love baking with pumpkins probably more than most people all-year-long.
Pumpkin Puree for Pumpkin Bread:
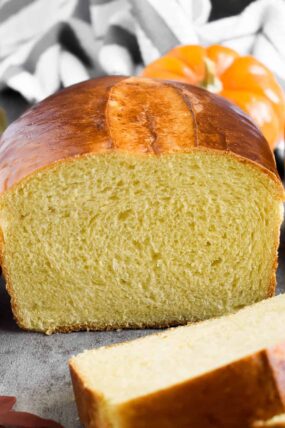
My mom’s famous Ukrainian Pumpkin Bread is the main reason I started canning pumpkin puree. We all absolutely love this bread and mom makes it for us for major holidays every year. She would make a round giant loaf for every child and it’s the traditional she continues and we love.
This bread does not work with store-bought canned pumpkin so homemade pumpkin puree is a must! With homemade pumpkin puree, pumpkin bread turns out light and fluffy, with a light yellow-dish color, while it’s everything the opposite if using store-bought puree.

Storing Pumpkin Puree
There are few ways to store pumpkin puree for fresh and safe usage later. Opened jars would be used within a week. Canned twice-boiled pumpkin puree in sterilized jars can be stored in refrigerator for up to a year. Baked pumpkin should be stored only 3 months in refrigerator.
To freeze pumpkin puree, I do one cup in a small freezer bag and freeze up to a year. Frozen homemade pumpkin puree is always slightly watery than the puree you buy from store in cans or not frozen, but it works great in recipes calling for homemade pumpkin puree, even if there’s a bit extra water after thawing the puree.
Pumpkin Puree Ingredients:
- Pumpkin (any size, I used about 14”)
- Water (cold, warm or hot)

How to Make Pumpkin Puree:
1. Wash the pumpkin with warm water and use sponge if needed to get any dirt off (you don’t want the dirt accidentally getting into puree). Using a sharp knife, cut the pumpkin in half and remove the seeds and scrape out the pumpkin pulp. (Keep the seeds refrigerated until you’re ready to toast them!)
Cut the pumpkin into any smaller sizes, cubes or rectangles, peel with a thin knife, cut into 2” cubes and add to a large pot. Add cold, warm or hot water about 2” below pumpkin cubes – it doesn’t have to cover all the pumpkin. Bring the pot to a boil over high heat, lower the heat to low and cook for 1 hour or until you can easily pierce the pumpkin cubes with a fork.

How to Sterilize Jars and Lids:
2. While pumpkin is cooking, preheat the oven to a 215°F. Wash jars and lids with a warm soapy water. Place the jars into the oven on the center rack upside down and dry them for 20 mins or until completely dry (20 mins always works for me). Boil lids in a medium pot for 4-5 mins. Drain the water and transfer hot lids to a kitchen towel to dry while pumpkin is cooking.

3. Once pumpkin is cooked, drain most water (water will keep running little by little, but drain the huge flow) and set the pumpkin to cool a bit so you don’t blunt the blender knives. Once cooled, using a blender or a food processor, puree the cooked pumpkin in batches until applesauce consistency (1-2 mins in blender worked great). Remove any remaining water from the pot and pour the pureed pumpkin back into the pot. Do it fast to avoid major splashing. Bring the pumpkin puree to a boil over low heat (#4 on my cook-top) and cook/boil for another 10-15 mins. (Puree will start boiling almost right away, but the way to know when it’s really boiling is when the puree has huge bubbles, the top of the lid is all splashed up and the pot is really hot).
Spoon pumpkin puree into jars. Wipe the rim with a paper towel to make sure it’s free of any puree and tightly close each jar right away (but not too tight that the jar can’t handle).
 4. Cover jars with couple kitchen towels until completely cooled – it might take a day. Pumpkin puree can be used right away, stored in refrigerator or in the freezer for up to a year.

More Tips from Olga:
- Perfect Hard-Boiled Eggs (Every Time) – the only method we use with excellent results each time
- Buying, Grinding and Storing Ground Pork Meat – learn to have ground meat in freezer at all times
- Dulce de Leche (Cooked Condensed Milk) – thick consistency every time, great to use in fillings
- Oven Dried Bread – store for months to use in meatballs
Making and Canning Homemade Pumpkin Puree
Ingredients
- pumpkin, any size, I used about 14”
- water, cold, warm or hot
Instructions
- Wash the pumpkin with warm water and use sponge if needed to get any dirt off (you don’t want the dirt accidently getting into puree).
- Using a sharp knife, cut the pumpkin in half and remove the seeds and scrape out the pumpkin pulp. (Keep the seeds refrigerated until you’re ready to toast them!)
- Cut the pumpkin into any smaller sizes, cubes or rectangles, peel with a thin knife, cut into 2” cubes and add to a large pot. (You might need couple pots.) Add cold, warm or hot water (cold will take longer to get to a boil) about 2” below pumpkin cubes – it doesn’t have to cover all the pumpkin.
- Bring the pot to a boil over high heat, lower the heat to low and cook for 1 hour or until you can easily pierce the pumpkin cubes with a fork. (prolonged cooking will remove bacteria, if any, for prolonged storage)
- STERILIZING JARS and LIDS: While pumpkin is cooking, preheat the oven to a 215°F. Wash jars and lids with a warm soapy water. Place the jars into the oven on the center rack upside down and dry them for 20 mins or until completely dry (20 mins always works for me). Remove hot jars with pot holders onto kitchen towel – keep them upside down to prevent any lint from getting inside the jars. Boil lids in a medium pot for 4-5 mins. Drain the water and transfer hot lids to a kitchen towel to dry while pumpkin is cooking.
- Once pumpkin is cooked, drain most water (water will keep running little by little, but drain the huge flow) and set the pumpkin to cool a bit so you don’t blunt the blender knives. Once cooled, using a blender or a food processor, puree the cooked pumpkin in batches until applesauce consistency (1-2 mins in blender worked great). Remove any remaining water from the pot and pour the pureed pumpkin back into the pot. Do it fast to avoid major splashing.
- Bring the pumpkin puree to a boil over low heat and cook/boil for another 10-15 mins. (Puree will start boiling almost right away, but the way to know when it’s really boiling is when the puree has huge bubbles, the top of the lid is all splashed up and the pot is really hot). Spoon pumpkin puree into jars. Wipe the rim with a paper towel to make sure it’s free of any puree and tightly close each jar right away (but not too tight that the jar can’t handle).
- Cover jars with couple kitchen towels until completely cooled – it might take a day.
- Pumpkin puree can be used right away, stored in cooler temperature, refrigerator or freezer for up to a year.
Notes
Sign Up for My Email List
Something sweet for your inbox! Join others and subscribe to my free email list. You’ll get every new recipe and post as they’re published, plus an email with my most popular tips and recipes.


Sylvie says:
I haven’t made it yet, but was wondering if you need to add any salt?
Olga in the Kitchen says:
Hi Sylvie! No, we don’t add salt. Whenever you make a recipe that calls for pumpkin puree, that’s when you would add the salt (in the recipe itself).
suha says:
Thank you for the tutorial. Do you put the puree in the jar while still hot?
Olga in the Kitchen says:
Yes! Please see the recipe, all the steps are in the recipe card.
Krista says:
Would the double boil method work for preserving other things? Like pasta sauce that may be a little low in acidity?
Olga in the Kitchen says:
I honestly wouldn’t know, without experimenting myself, but because of this double boiling, I have couple jars of puree left from 2 years ago that are as good as on day one.