Oreshki Recipe (Walnut Shaped Cookies)
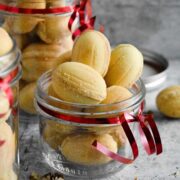
Oreshki are the traditional crisp and flaky Walnut Shaped Cookies filled with dulce de leche filling. These beautiful delights are the iconic treats for Slavic families, especially during holidays and special occasions. The golden exterior of these cookies give a nice touch to the dessert table.

This post may contain affiliate links. Read my disclosure policy.
The Oreshki dessert had been in our family since before I was born. They are always prepared for weddings, Easter, Christmas, Thanksgiving and even for a regular Sunday family dinner. This oreshki recipe was shared with me by my sister Alla a decade ago.
These walnut shaped cookies are one of the treats that could be given out to friends and family as a homemade Christmas gift. They are small, fit nicely into a jar or box and do not melt.

When the filled oreshki are refrigerated, the dulce de leche filling firms up and connects with the cookie shell. Later, even if you decide to keep them for hours at room temperature, the filling will not leak out.
What are Oreshki?
Oreshki are the crisp and flaky golden exterior walnut shaped cookies filled with dulce de leche filling. They are the all-time favorite dessert among adults and children in Slavic families. Out of so many dessert recipes, this got to be in the top 5.
The cookie shell itself is usually made out of some kind butter dough and filled with homemade dulce de leche that is combined with butter for lesser sweetness.
Many times these are filled with oreshki crumbs and toasted walnut or pecan in the center of each cookie. My family and I prefer these with a simple dulce de leche filling, therefore I never fill these with anything else.

My mom’s method for homemade dulce de leche (cooked sweetened condensed milk) always comes out really thick in texture. It is a lot easier to work with firm dulce de leche filling for any dessert.
Where to Get Molds for Walnut Shaped Cookies?
Nowadays, there are so many different walnut shaped cookie molds and appliances available out there. There are single molds for the oven, an electric or for gas stove and even rare oven molds. It does not matter what mold you’re using, this recipe works well for any.
I’m using the electric oreshki maker in this recipe. I purchased mine from this website. The one thing I don’t really like about this appliance is when you press, the cookies closer to back get squeezed more and if you hold longer, they will get really dark compared to other cookie shells.

However, I like using it because it is so much faster and holds 24 shells at one time. You do not have to worry about shaping the oreshki dough into each mold. You just press, wait and it’s baked.
Ingredients in Walnut Shaped Cookies:
The dough for walnut shaped cookies is so simple to make and literally takes minutes. The entire recipe is so easy, but might seem a little time-consuming for someone who never made them.
The mayonnaise, egg yolks and powdered sugar make these treats crisp and flaky, kind of like a butter cookie recipe.
This recipe makes about 110 shells. That is 55 walnut shaped cookies, filled with the super tasty dulce de leche filling.
- Egg yolks
- Powdered sugar
- Real mayonnaise
- Unsalted butter
- Baking soda
- Distilled white vinegar
- Vanilla extract
- All-purpose flour
- Dulce de Leche

How to Make Walnut Shaped Cookies?
Oreshki dough:
- In a large bowl, combine and beat 3 egg yolks and 1 cup powdered sugar.
- In a small bowl, combine 1 teaspoon baking soda and 2 teaspoons distilled white vinegar; it will fizz.
- Add the baking soda mixture, 2 sticks unsalted butter, 1 tablespoon mayo and 1/2 teaspoon vanilla extract to the bowl with eggs. Beat for another minute to combine.
- Add 3 cups all-purpose flour (1 cup at a time). Beat until just combined with each addition.
- Wrap the dough with plastic food wrap and make a flat disk to about 1-inch thick. Refrigerate dough for 1 hour or up to 2 days.

Bake oreshki:
- Preheat the oreshki maker while you work with the dough.
- Fully fill a 1 teaspoon measuring spoon with dough and then scoop it out with your finger. Roll an egg-shaped dough balls. (Make at least 24 to fill all the molds or how many your oreshki maker does at one time).
- Place 1 ball into each cookie mold and gently press to close the lid. Bake for 2 1/2 minutes.
- Remove baked cookie shells to a clean tray using a disposable knife or fork. Repeat until no dough left.
- Using a small sharp knife, trim the edges of each cookie. Crush all the cookie scraps into small crumbs using your hands.

Make dulce de leche filling and fill oreshki:
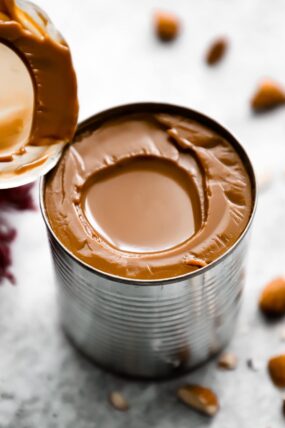
- In a medium bowl, combine 1 (14 oz) can dulce de leche and 1/2 stick (or 1/4 cup) unsalted butter. Beat on high speed until combined.
- With help of a dull knife, fill each cookie shell with dulce de leche filling. Gently (no pressing) put 2 shells together to create a walnut shaped cookie. I like to add some cookie crumbs to the seams to cover any dulce de leche showing and to give these cookies a festive look. Continue until all cookies are filled.
- Refrigerate walnut shaped cookies for at least 4 hours before serving.

Filling Variations for Oreshki:
Oreshki cookies are traditionally filled with dulce de leche filling, but the filling variations are never-ending.
- Dulce de leche and crumbs. Combined dulce de leche, butter and oreshki crumbs.
- Walnuts or Pecans. Finely ground toasted walnuts or pecans and combine with cookie crumbs and dulce de leche. You can also add half or quarter of toasted walnut or pecan into the center of each cookie.
- Dulce de leche, butter and cream cheese. The cream cheese will give a slight tang and create a less sweet filling.
- Chocolate. Microwave chocolate chips to melt or use stove top method. Cool to room temperature before filling.
- Jam or fruit spread. The thicker the jam or spread, the better.
- Nutella. With a decadent hazelnut flavor.
- Heavy cream and cream cheese. Add powdered sugar and vanilla for sweetness.
- Custard. Just as you would make for eclairs.

Storing Walnut Shaped Cookies:
- Cookies without filling. Store walnut shaped cookies in an airtight container at room temperature for up to 1 month. You can also place them into a baking dish and tightly cover with plastic food wrap.
- Filled walnut shaped cookies. Refrigerate filled cookies with dulce de leche for up to 1 week. They even taste better refrigerated.

Family Favorite Christmas Desserts:
- Peach Pastries – very similar to oreshki, but no appliance is needed
- Chocolate Spartak Cake – thin-layered cake with sour cream frosting. It’s a family favorite!
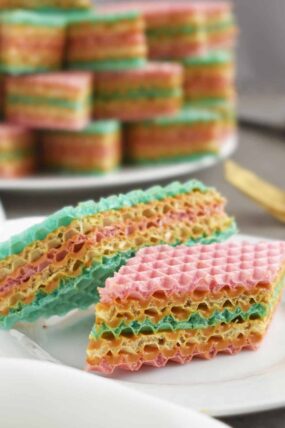
- Ukrainian Dulce de Leche Waffle Cake – the easiest dessert for holidays, no baking required
- Cream Filled Pizzelles (Trubochki) – family favorite dessert for decades. These are always gone first from the table!
- Rugelach (rogaliki) – rolled in powdered sugar, flaky little treats
How to Clean Electric Oreshki Maker:
To prolong lifetime of your oreshki maker, it’s important to clean it after each use. Let the oreshki maker cool completely. Use a brush to brush off any crumbs and then with a wet and dry paper towels, clean each mold and sides.
I use toothpick to get into little spaces. It might sound like a headache, but this way your future walnut shaped cookies will always look clean and elegant. My appliance is about 8 years old as of today. Taking care of your kitchen appliances pays off with delicious treats!

Oreshki Recipe (Walnut Shaped Cookies)
Ingredients
Walnut Shaped Cookies:
- 3 egg yolks – room temperature
- 1 cup powdered sugar
- 1 teaspoon baking soda
- 2 teaspoons distilled white vinegar
- 1 tablespoon mayonnaise
- 1 cup (or 2 sticks) unsalted butter – room temperature
- 1/2 teaspoon vanilla extract
- 3 cups all-purpose flour, – sifted (might need 1/4 cup additional)
Dulce de Leche Filling:
- 1 (14 oz) can dulce de leche
- 1/4 cup (or 1/2 stick) unsalted butter – room temp
Instructions
To Make Oreshki Dough:
- Separate egg whites from egg yolks. In a large bowl, combine 3 egg yolks and 1 cup powdered sugar. Beat on high speed for 1-2 minutes (start low) until slightly lightened in color.
- In a small bowl, combine 1 tsp baking soda and 2 tsp distilled white vinegar; it will fizz. Pour the baking soda mixture into the large bowl with eggs and add 2 sticks unsalted butter, 1 tbsp mayo and 1/2 tsp vanilla extract. Beat for another minute to combine.
- Add 3 cups all-purpose flour (1 cup at a time). Beat until just combined with each addition. If dough feels a bit too soft, add another 1/4 cup flour and stir with a spatula. Dough will be sticky and you might think it needs more flour, but it will thicken in refrigerator.
- Wrap the dough with plastic food wrap and make a flat disk to about 1-inch thick. Refrigerate for 1 hour or up to 2 days if planning to bake these later.
To Bake Oreshki:
- 1 HOUR LATER: preheat the oreshki maker while you work with the dough.
- Fully fill a 1 teaspoon measuring spoon with dough and then scoop it out with your finger. Roll an egg-shaped dough balls. (Make at least 24 to fill all the molds or how many your oreshki maker has). This is the fastest and easiest way to make the dough balls. It will ensure all cookies are similar and the excess dough is not oozing out of the oreshki maker. You will have enough cookie scraps for the filling.
- Once the appliance is ready, place 1 ball into each cookie mold and gently press to close the lid. Press just until clicked or closed; do not press all the way or the oreshki shells will come out too thin. Bake for 2 1/2 minutes. (If this is your first time making oreshki, check at 2-minute mark). Shells should be yellow-ish to lightly golden. Keep rolling the dough balls for another round while these are baking. You do not need to refrigerate the dough before each addition. I tried and I did not see any difference. The baking process takes less than 20 minutes, which is not much for butter dough to really soften.
- Remove baked cookie shells to a clean tray using a disposable knife or fork. Repeat previous step until all oreshki shells are baked.
- Using a small sharp knife, trim the edges of each cookie. Crush all the cookie scraps into small crumbs with your hands. You do not need a food processor or a rolling pin.
To Make Dulce de Leche Filling and Fill Oreshki:
- In a medium bowl, combine 1 (14 oz) can dulce de leche and 1/2 stick (or 1/4 cup) unsalted butter. Beat on high speed for about 2 minutes until combined. If necessary, refrigerate filling for an hour or so if it turns out too runny. Different homemade dulce de leche methods have different texture results.
- With help of a dull knife, fill each cookie shell with dulce de leche filling. Gently (no pressing) put 2 shells together, filling side toward each other to create a walnut shaped cookie. I like to add some cookie crumbs to the seams to cover any dulce de leche showing and to give these cookies a festive look. Continue until all cookies are filled. I always have just enough filling for all.
- Place cookies in a tray, preferably seam side on a side until cookies set in refrigerator, to prevent any dulce de leche leaking out. Refrigerate for at least 4 hours before serving.
- Walnut shaped cookies stay fresh up to 1 week in refrigerator.
Notes
- Special Tools: Oreshki Maker | Pastry Brush | Stainless Steel Tray | Mixer | Bowls
- Bake cookies in advance. Cookies can be baked up to a month in advance and filled closer to the event.
- Resting time: it’s important for dough to cool and rest in refrigerator minimum 60 minutes and up to 2 days before baking.
- Use 1 teaspoon measuring spoon to ensure all cookie shells are similar in size.
- Baking time: depends on what oreshki maker you’re using. For this electric appliance, I did maximum 2 1/2 minutes for each addition. Any longer will make them dark and they taste burned.
- Prepare minimum 24 dough balls for next batch while one is baking to fasten the baking process.
- Clean oreshki maker. Clean appliance surface after each batch using a brush. This way all of the oreshki cookies will come out clean without any burned crumbs on them.
Sign Up for My Email List
Something sweet for your inbox! Join others and subscribe to my free email list. You’ll get every new recipe and post as they’re published, plus an email with my most popular tips and recipes.

Ilona says:
Keeping the baby weight on one Oreshik at a time, haha. These are so good, they take me back to holidays at church. My American husband did not grow up with these, so we have a lot of make up work to do!
I made Modevik and these Oreshki in the same week and, in a shocking turn of events, no one fought over the last slice of cake, but my husband and three boys were constantly caught “in the cookie jar”.
I filled a couple with grape jelly mixed with crumbs and, to me, they were equally delicious to the dulce ones (that sounds so wrong, but it’s true). I plan to make these for a women’s event at my church and I’m glad to have found a dependable recipe!
Any tips for trimming the sides more neatly? I will sharpen my paring knife, but I think my cookies were a little too jagged on the sides. Maybe less flour?
Olga in the Kitchen says:
Thank you for sharing the story with us, Ilona! 🙂 I’m so happy to hear you’re enjoying this yummy recipe. For trimming the sides, I just use a thin small knife and gently go around the edges. Trim in little sections, rather than cutting out a circle around the cookie. Because these have a very crispy texture, it’s easy to make them picture-perfect if you want the not-so-nice-looking edges to be hidden. When you fill them with cream, I place the 2 cookie pieces together and I like to smooth out the part where it’s connected by adding little bit of crumbs from the trimmed sides and go around the cookie with a finger, pressing the crumbs into the sides, hiding whatever spacing or imperfections you see. (make sure you don’t have dulce de leche on your finger before you do that). It will smooth out the edges, making them look perfect and most times you cannot even tell where the 2 cookie pieces are connected. Hope this helps!
Victoria Tasia Itzel says:
I just tried making this recipe but I used Gluten Free Flour and unfortunately my cookies kept sticking to the pan and crumbling. The color of the cookies was perfect. Any suggestions on what I can do to make this cookies Gluten Free. Also what kind of Oreshki maker is the best?
My family loves Oreshki when we get them from Ukrainian store. But I would like to learn to make them at home.
Olga in the Kitchen says:
Hi Victoria! I am not familiar with gluten-free baking, therefore, I cannot send any recommendations. Sometimes, when I use a different bag of flour or different brand, the recipe might require additional flour because if the dough is too sticky, it will stick more to the molds. Always make sure you use refrigerated dough to keep the shape and prevent extra sticking. I personally use oven molds and electric oreshki maker, like them both, they just provide different shape. There are many molds out there nowadays, depends what shape you’re looking for (more walnut looking or more plain/less design on the baked cookie).
Ydalí says:
I plan on making these cookies as Christmas gifts. I like to make cookies from different countries each year. How many cookies does your recipe make?
Olga in the Kitchen says:
Hi! It depends on the type of mold you are using and how big you are rolling the dough balls. It always depends, but usually runs between 30-40 complete/filled cookies from this recipe.
Helen Galloro says:
Hi Olga i have walnut cookie molds to put in the oven . Do. I put the walnut cookies in for 2.5 mins to bake ? Also can I make the cookies in advance and fill them later .I would like to bake the cookies and put them in the freezer for three weeks can I do that. Thank you
For helping me
Olga in the Kitchen says:
Hi Helen! For the oven version, my oven bakes these for 18 minutes at 375 degrees F. You might try for 15 minutes and check if there are golden-brown color, since different ovens might bake less or longer. You can make the cookies in advance, even a month in advance and keep them in an airtight container at room temperature and fill when you need to. I don’t ever put the unfilled cookies in the freezer since it might affect the texture when they are thawed.
CHARLOTTE BRUZEK says:
I am using an oreshki maker with wooden handles. Is this to be used over a gas stove or does this go in the oven?
Olga in the Kitchen says:
I am using an electric walnut maker in this recipe, but this same recipe works well in the oven as well. I don’t have a gas one (never did), but since it works for oven and electric, there is a possibility it might work well for the gas version as well. If you do decide to experiment, I would love to hear the results! Thanks!
Kate says:
Once the cookies are filled do they need to be refrigerated or are they shelf stable? Do they need to be eaten the day they are made or within several days? I am hoping to include these on a cookie table for my daughter’s wedding but they will need to be assembled with the filling at least the day or two before the wedding. Thank you.
Olga in the Kitchen says:
Once they are filled, it’s best to refrigerate them. For once, it will give a chance for the cream to set and not leak out from the cookie. Cookies stay fresh for a week. If I’m being honest, I had them in refrigerator for almost 2 weeks few times and they taste just as good. You can fill them even a week ahead and keep them refrigerated, covered with plastic food wrap or in a container with lid to make sure they don’t absorb other food smells in the fridge. These cookies are a must at every Ukrainian wedding 🙂
Anna M Wegrzyn says:
Hi,
Just a question about oreshki. You mention that you could make them up to a month in advance before you fill them. Do you freeze them in the meantime and if not, how do you store it? A month seems like a long time…
Olga in the Kitchen says:
Hi Anna! I just keep them in a plastic container with a lid in my pantry. The cookies are made out of butter, so there is nothing raw left once they are baked (they are fully crispy and baked). A month is nothing compared to 6 months they keep at European stores. I personally kept them for as long as 3 months (to experience) and they tasted just as fresh as on day 1. You can try freezing them, but I cannot advise anything as I never experimented myself. Hope this helps! 🙂